
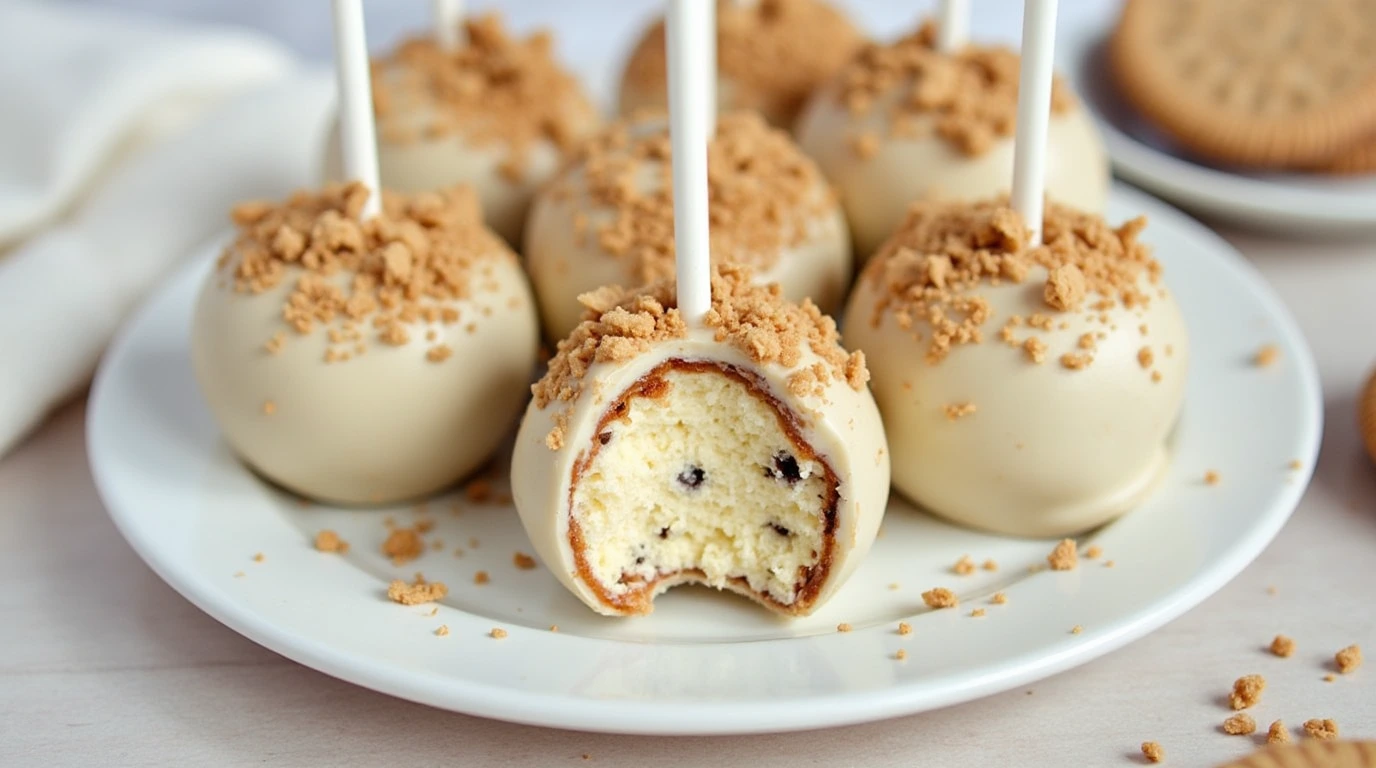
Looking for a candy that’s as fun to make as it is to eat? Cookie and Cream Cake Pops are the perfect answer! These bite-sized delights combine the rich, creamy flavor of cookies and cream with the convenience of an easy-to-make dessert. Perfect for parties, gifts, or just satisfying your sweet tooth, they’re as versatile as they are delicious. With no baking required and endless decorating options, this recipe is ideal for both beginners and seasoned bakers. Get ready to impress your friends and family with these irresistible, melt-in-your-mouth treats!
Key Benefits of Cookie and Cream Cake Pops
Cookie and Cream Cake Pops are more than just a dessert—they’re a fun, versatile, and crowd-pleasing treat that’s perfect for any occasion. Here are the key benefits of making these bite-sized delights:
- Easy and No-Bake: This recipe requires no baking, making it accessible for beginners and a breeze for experienced bakers.
- Perfect for Any Occasion: Whether it’s a birthday party, holiday gathering, or a fun weekend project, these cake pops fit the bill.
- Customizable and Creative: From sprinkles and drizzle designs to various coating options, you can easily personalize them to suit your style or event theme.
- Kid-Friendly Fun: Kids will love helping out with rolling the cake pops, dipping them in chocolate, and decorating with their favorite toppings.
- Ideal for Gifting: Their adorable size and professional look make them a thoughtful, homemade gift for friends and family.
These little treats are not only delicious but also a fantastic way to add a touch of creativity to your dessert game. They’re guaranteed to bring smiles with every bite!
Ingredients for Cookie and Cream Cake Pops
Before we dive into making these irresistible treats, let’s gather everything you’ll need. These ingredients are simple, accessible, and combine perfectly to create that iconic cookies-and-cream flavor.
Here’s what you’ll need:
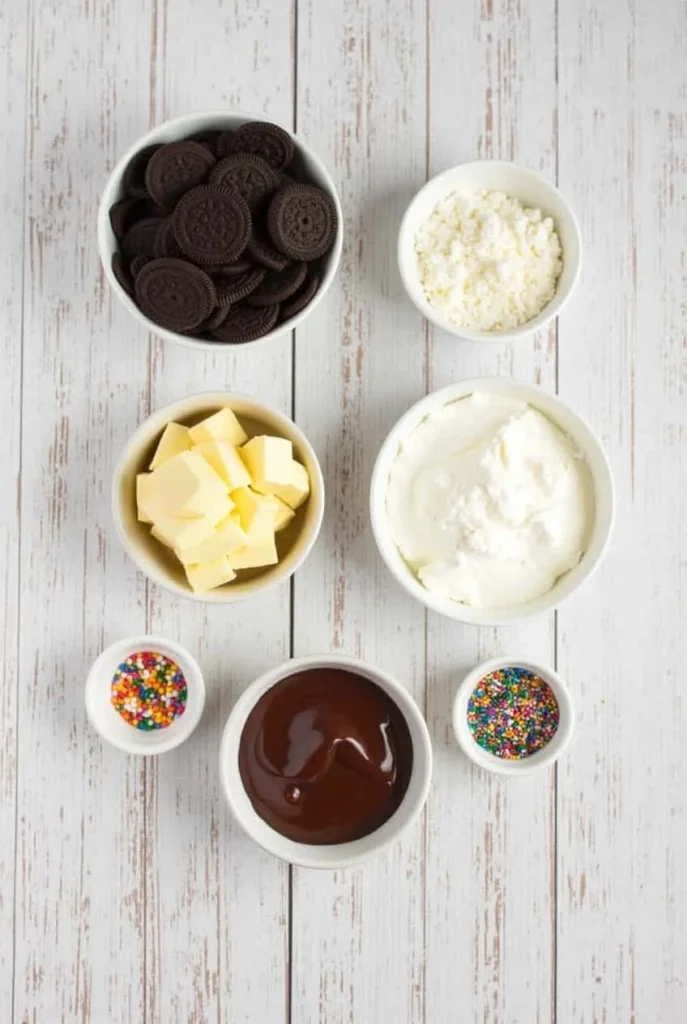
- 1 package of chocolate sandwich cookies (about 36 cookies) – Crush these into fine crumbs for the base of the cake pops.
- 4 oz (half a block) of cream cheese, softened – This helps bind the crushed cookies into a smooth, moldable dough.
- 8 oz of white chocolate or candy melts – Use these for dipping and coating your cake pops.
- Sprinkles or crushed cookies – Optional, but they’re perfect for adding a decorative touch.
- Cake pop sticks or skewers – Essential for holding your cake pops together while dipping.
Optional additions:
- Dark chocolate for drizzling – Add a decorative and flavorful contrast.
- Gel food coloring – If you want to add a pop of color to the coating, this is a fun option.
Pro Tips for Ingredients:
- Use high-quality chocolate or candy melts for a smoother, shinier coating that’s easier to work with.
- If you’re out of cake pop sticks, toothpicks or sturdy skewers can be great substitutes.
- Soften the cream cheese before mixing—it blends more easily with the cookie crumbs.
With just a handful of ingredients, you’re set to create these delectable Cookie and Cream Cake Pops. It’s time to roll up your sleeves and bring these to life!
How to Make Cookie and Cream Cake Pops
Making these cake pops is an absolute breeze! Whether you’re a seasoned baker or a beginner, I’ll walk you through each step to create these irresistible treats. Follow the directions carefully, and you’ll be enjoying your homemade cookie and cream cake pops in no time.
Step-by-Step Instructions:
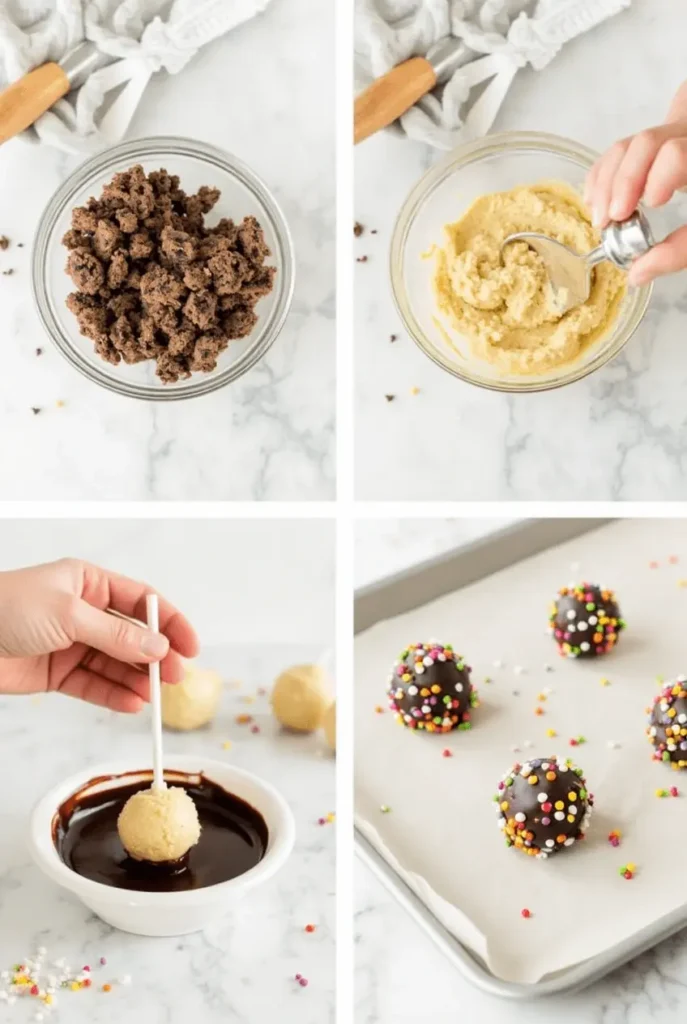
- Crush the Cookies
Start by placing your chocolate sandwich cookies (about 36) into a food processor or a ziplock bag. Crush them into fine crumbs—think of a texture like sand, with no large chunks left. This is the base of your cake pops. - Mix with Cream Cheese
Add the softened cream cheese (4 oz) to the crushed cookies. Mix until the two ingredients are well combined. The mixture should stick together when pressed, forming a dough-like texture. If it’s too crumbly, add a little more cream cheese until you reach the right consistency. - Roll into Balls
Take spoonfuls of the cookie mixture and roll them into balls, about the size of a small golf ball. This will give you approximately 20-24 cake pops. Place the balls on a baking sheet lined with parchment paper to prevent sticking. - Insert Cake Pop Sticks
Melt a small amount of your white chocolate or candy melts. Dip the tip of your cake pop stick into the melted chocolate and gently insert it into the center of each ball. This acts as glue to keep the stick securely in place. - Chill the Cake Pops
Chill the cake pops in the fridge for about 30 minutes, allowing them to firm up. This helps them hold their shape when you start dipping them in chocolate. - Dip in White Chocolate
Once the cake pops are chilled, melt the remaining white chocolate or candy melts in a microwave-safe bowl. Dip each cake pop into the melted chocolate, ensuring it’s fully covered. Tap gently to remove any excess chocolate. If you like, you can drizzle additional chocolate over them for extra flair. - Decorate and Set
While the chocolate coating is still wet, roll your cake pops in crushed cookies, sprinkles, or drizzle with some dark chocolate. Let the pops set by placing them upright in a cake pop stand or a cup, allowing the coating to dry completely.
Pro Tips for Perfect Cake Pops:
- Temperature matters: Make sure the cake pops are chilled before dipping. It’ll help the chocolate set quickly and avoid cracking.
- Smooth dipping: To avoid air bubbles or an uneven coating, be sure the chocolate is smooth before dipping, and tap off any excess gently.
- Creative decorations: Feel free to get creative with your toppings—crushed candy, sprinkles, or even a swirl of caramel for added flavor.
With these simple steps, you’ll have a batch of gorgeous, melt-in-your-mouth cookie and cream cake pops ready to enjoy. The best part? They’re customizable, so you can get as creative as you like with the toppings!
Pro Tips and Variations for Cookie and Cream Cake Pops
Now that you’ve mastered the basics of making cookie and cream cake pops, let’s dive into some pro tips and exciting variations that will elevate your baking game even further. These simple yet clever tweaks will help you perfect your cake pops every time!
Pro Tips for Success:
- Use the Right Texture:
Achieving the perfect cake pop starts with the right texture. The mixture should hold together firmly but still be soft enough to easily shape into balls. If your dough is too crumbly, add more cream cheese; if it’s too wet, add a few more cookie crumbs. - Let the Cake Pops Cool Completely:
After dipping the cake pops in melted chocolate or candy melts, make sure they cool completely before serving or storing them. This ensures that the chocolate coating doesn’t melt or lose its shape. Place the cake pops in a cake pop stand or a simple cup to help them stay upright. - Work in Small Batches:
If you’re making a large batch, consider working in smaller sections. Melting chocolate can harden quickly, and the cake pops will be easier to manage when dipped in smaller batches. This way, you can ensure that every cake pop gets evenly coated and decorated. - Use Candy Melts for a Smoother Finish:
Candy melts are a great alternative to chocolate chips because they are specifically designed for coating treats like cake pops. They melt smoother and are less likely to seize up. Plus, they come in various colors and flavors, so you can have fun with the decoration!
Delicious Variations to Try:
- Add Sprinkles or Crushed Nuts:
For a fun twist, roll your cake pops in colorful sprinkles or crushed nuts like almonds or hazelnuts. The crunch adds texture and a pop of color to your cake pops. - Chocolate Dipped with a Twist:
Instead of sticking with traditional white chocolate, experiment with dark or milk chocolate. You could even mix them together for a marbled effect! A layer of caramel or peanut butter drizzle on top can also make them extra special. - Flavor Variations:
Want to shake things up? Use different cookies! Try using Oreos with peanut butter filling, mint-flavored cookies, or even chocolate chip cookies. You can also swap out the cream cheese for frosting for a slightly different texture and flavor. - Themed Cake Pops:
These cake pops can be dressed up for any occasion! For a birthday party, use colorful sprinkles and match the candy melts to the theme colors. For Halloween, go with orange and black candy melts and top them with spooky decorations like mini candy eyeballs or edible glitter.
By incorporating these pro tips and variations, you’ll not only make your cookie and cream cake pops look even more fabulous, but they’ll also taste even better! Whether you stick to the classic or get creative with your own twist, the key to perfecting your cake pops is to have fun with the process.
Serving Suggestions for Cookie and Cream Cake Pops
These delightful cookie and cream cake pops aren’t just a treat to make – they’re a treat to serve, too! Whether you’re hosting a celebration or just craving a fun dessert, these cake pops will make an impression. Below are a few serving ideas to help you make the most of this delicious treat.
Creative Ways to Serve Cake Pops:
- Cake Pop Stands for Easy Display:
A cake pop stand is a simple yet elegant way to serve these treats. It keeps them upright, making them easier for guests to grab. Plus, it looks beautiful on any dessert table. You can find stands that fit multiple cake pops or even get creative and use floral foam inside a decorative container to hold them. - On a Dessert Platter:
Arrange your cake pops in a pretty dessert platter for an eye-catching display. You can mix them with other sweet treats like cupcakes, cookies, or macarons for a more festive touch. This is a great option for parties or gatherings! - Gift Them in Cute Packaging:
Cake pops make fantastic homemade gifts. Package them individually in clear bags with a pretty ribbon for a thoughtful, personalized touch. You could also create a mini cake pop bouquet using a vase or jar filled with cake pops for a unique, edible centerpiece. - Themed Serving for Special Occasions:
Dress up your cake pops for the occasion. For birthdays, use bright, colorful sprinkles and matching ribbons. For holidays like Christmas or Valentine’s Day, you can decorate the cake pops with themed colors (red, green, white, etc.) and adorable mini decorations like hearts or stars. - Serve with Dips or Sauces:
Add a little extra fun by serving your cake pops with a selection of dipping sauces. Think chocolate, caramel, or even a fruit syrup like raspberry or strawberry. Not only does this add an extra layer of flavor, but it also gives your guests a fun way to enjoy their treats. - Pair with Beverages:
Cake pops pair wonderfully with hot drinks like coffee, hot chocolate, or a creamy latte. For a more festive vibe, serve them with milkshakes or cold brew coffee. The contrast of the cake’s richness and the beverage’s temperature makes for an indulgent pairing.
For Kid-Friendly Fun:
Cake pops are also a big hit with kids, so here are some ideas to make them even more enjoyable for the little ones:
- Mini Cake Pop “Ice Cream Cones”:
Turn your cake pops into “ice cream cones” by attaching them to small cones and serving them as mini ice cream treats. This fun twist is sure to delight children and add a playful touch to your party table. - Decorate Together:
Set up a decorating station where kids can customize their own cake pops. Provide extra sprinkles, colored sugar, mini candies, or edible glitter. It’s a fun, interactive activity that’s both creative and delicious!
By serving these cookie and cream cake pops in one of these ways, you’ll ensure they’re the star of the show – whether it’s a simple family gathering or a big celebration. With endless options for customization, you can make these cake pops work for any occasion!
Conclusion: Cookie and Cream Cake Pops That Will Melt Your Heart
Congratulations, you’ve just mastered the art of making cookie and cream cake pops – a fun, indulgent treat that is sure to steal the spotlight at any gathering. These cake pops combine the irresistible flavors of chocolate and cream, making them a perfect dessert for parties, celebrations, or simply when you want to treat yourself.
Whether you’ve made them for a birthday party, a holiday get-together, or just because, cookie and cream cake pops will leave everyone asking for more. They’re not only delicious but versatile, with endless ways to decorate and present them. You can play with flavors, colors, and toppings to make them suit any occasion, from casual to festive.
If you’re looking for an easy, yet delightful dessert that will wow your guests and satisfy your sweet tooth, this recipe is the one to try. Don’t forget that these cookie and cream cake pops are just as fun to make as they are to eat – so gather your ingredients and get creative with your decorations!
Quick Recap of Why You’ll Love These Cake Pops:
- Delicious: The perfect blend of creamy, chocolatey, and slightly crunchy textures.
- Customizable: Decorate them for any occasion with endless possibilities.
- Fun to Make: Easy steps for a hands-on, enjoyable baking experience.
- Perfect for Any Event: Whether it’s a birthday, holiday, or casual treat, cake pops are always a hit.
Happy baking, and enjoy the sweet, creamy goodness of your homemade cookie and cream cake pops!
FAQs: Cookie and Cream Cake Pops
Making cookie and cream cake pops for the first time can raise a few questions, and I’m here to help! Below are some frequently asked questions that will make your baking experience even easier.
1. Can I use a different type of cookie in this recipe?
2. How long can I store cake pops?
3. Can I freeze cake pops?
4. What’s the best way to melt chocolate for dipping?
Microwave method: Heat the chocolate in a microwave-safe bowl in 30-second intervals, stirring in between, until smooth.
Double-boiler method: Use a heatproof bowl over a pot of simmering water to melt the chocolate slowly and evenly. This method is great for preventing burning.
5. Can I make cake pops ahead of time?
6. How do I keep my cake pops from falling off the stick?
7. Can I decorate cake pops with sprinkles?
8. What type of chocolate works best for coating cake pops?
By addressing these FAQs, I hope to clear up any doubts and help you make the perfect cookie and cream cake pops. Happy baking, and enjoy every bite!